Surveys

A well-designed form automation workflow ensures every form submission triggers the right action without manual effort. This guide explains how webhooks, Zapier, and other automation tools streamline operations, improve lead management, and reduce repetitive tasks. You'll also learn the key features to evaluate before choosing an automation platform.
Nikhil Dogra
September 16, 2026
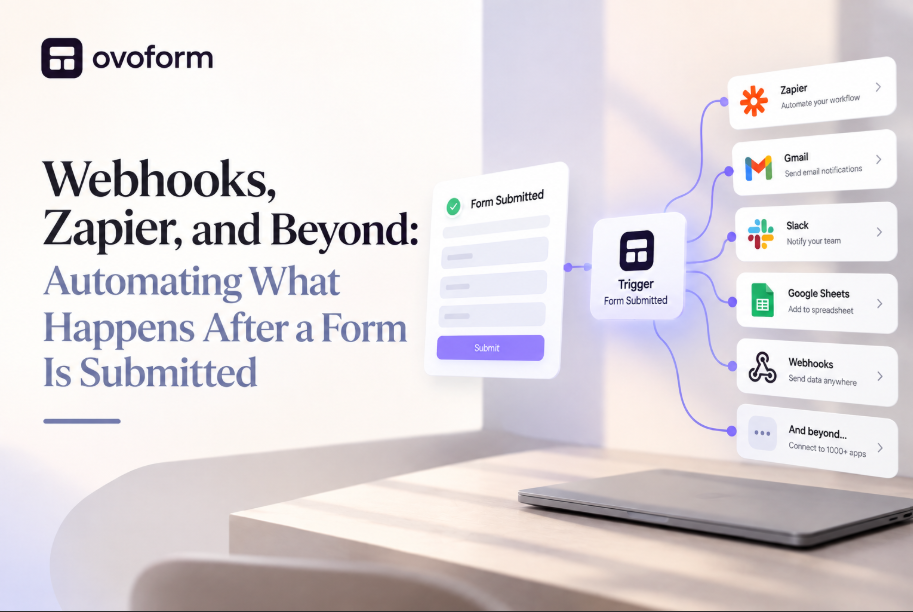
A form submission should not be the end of a process. It can be the starting point for a series of actions, adding a lead to your CRM, sending a confirmation email, updating a spreadsheet, notifying your sales team, or triggering another workflow.
A form automation workflow connects these actions so information moves automatically after someone submits a form. Depending on your needs, you can use native integrations, webhooks, Zapier, Make, or other automation platforms.
This guide explains how form automation works, when to use webhooks or Zapier, how to build a workflow, and what to look for when choosing a form automation tool.
What Is a Form Automation Workflow?
A form automation workflow is a series of automated actions triggered by a form submission.
For example:
Form submitted → Check response → Add lead to CRM → Notify sales → Send confirmation email
Instead of downloading responses and manually moving information between tools, the workflow handles those steps automatically.
A typical workflow has four components:
· Trigger: The form is submitted.
· Data: The submitted form responses.
· Logic: Conditions that determine what happens next.
· Action: The task performed after the submission.
The workflow can be simple, such as sending an email, or more advanced, such as routing leads based on their answers and creating different follow-up tasks for different customer segments.
Manual data handling becomes difficult as submission volume increases. Even a simple process can require someone to copy information between a form, spreadsheet, CRM, email platform, and internal communication tool.
Form automation helps reduce that manual work.
Instead of manually transferring every submission, automation can send the information directly to the right destination.
A workflow can immediately send a confirmation email, notify a salesperson, or trigger a follow-up task.
Automated field mapping reduces the risk of copying information into the wrong spreadsheet column or CRM field.
Different answers can trigger different actions. For example:
· High-value lead → Notify sales immediately
· Existing customer → Send to support
· Job application → Add to recruitment workflow
· Product feedback → Send to customer success
Connect the tools you already use
A form can become the starting point for a larger workflow involving CRMs, spreadsheets, email platforms, communication tools, databases, and other applications.
The exact setup varies between platforms, but the basic process is similar.
1. Someone submits the form: The form collects information such as name, email, company, preferences, or answers.
2. The submission triggers the workflow: The automation platform detects the new submission.
3. The workflow evaluates the data: Conditions can determine which path the submission should follow.
4. The workflow performs an action: The information may be added to a CRM, sent to another application, stored in a database, or used to trigger a notification.
5. The workflow continues or ends: A simple workflow may have one action. More advanced workflows can contain multiple steps and branches.
For example:
Lead form submitted → Check company size → If 100+ employees → Notify sales → Create CRM task → Send personalized email
This is where form automation becomes more useful than simply collecting responses.
Webhooks and Zapier can both connect forms to other systems, but they solve the problem differently.
| Webhooks | Zapier |
Setup | Requires endpoint/configuration | Visual no-code setup |
Coding | Often requires technical knowledge | Usually no coding required |
Flexibility | High | High for supported apps |
Best for | Custom systems and APIs | Connecting common business apps |
Maintenance | Usually technical | Easier for non-technical teams |
Ideal users | Developers and technical teams | Marketers, operations, and business teams |
Use a webhook when you need to send form data directly to a specific URL or application endpoint.
For example:
Form submission → Webhook → Your application → Internal processing
Webhooks are useful when your application has an API or custom endpoint that needs to receive the form data.
Zapier is useful when you want to connect a form with established business applications without building the integration yourself.
For example:
Form submission → Zapier → Google Sheets → Slack notification
Zapier currently supports a large ecosystem of applications and uses task-based usage for workflows. Its current Free plan includes 100 tasks per month, while paid plans provide higher usage and additional capabilities.
The choice is not necessarily webhooks or Zapier. Many businesses use both depending on the workflow.
How to Build a Form Automation Workflow
You do not need to automate everything at once. Start with one repetitive process and build from there.
Start by identifying what event should begin the workflow.
For most form automation workflows, the trigger is:
New form submission
But you may have different forms for different processes, such as:
· Customer feedback
· Support requests
· Product inquiries
Make the trigger specific enough that the workflow only runs when it should.
Before choosing an integration, define the desired outcome.
For example:
Goal: Ensure every qualified lead reaches sales quickly.
Your workflow might be:
Form submitted → Check lead type → Add to CRM → Notify sales → Send confirmation
Defining the outcome first prevents you from creating complicated workflows that do not solve a real business problem.
Decide whether the workflow should use:
· A native integration
· Webhook
· Zapier
· Make
· API
· Another automation platform
If your form builder already supports the application you need, a native integration may be the simplest option.
If you need a custom endpoint, use a webhook or API.
If you need to connect several third-party applications, an automation platform may be more practical.
Make sure the information collected by the form matches the fields required by the destination system.
For example:
Form field | CRM field |
Full Name | Contact Name |
Email Address | |
Company | Company |
Phone | Phone |
Lead Type | Lead Category |
Field mapping is one of the easiest parts of a workflow to overlook—and one of the most common causes of incorrect automation results.
Not every submission needs the same response.
Use conditions to route submissions based on answers.
For example:
If budget = $10,000+ → Notify sales
If budget < $10,000 → Add to marketing follow-up
Or:
If support request = urgent → Notify support team
If support request = general → Create standard ticket
Conditional routing makes the workflow more useful without requiring separate forms for every scenario.
Do not test only the ideal scenario.
Test:
· Complete submissions
· Missing optional information
· Different conditional paths
· Invalid or unexpected values
· Duplicate submissions
· Multiple submissions close together
Check both the form and the destination application to confirm that the right information reaches the right place.
After launch, check whether the workflow is actually working as expected.
Look for:
· Failed runs
· Missing fields
· Duplicate records
· Incorrect routing
· Delayed notifications
· Unnecessary steps
A workflow should be maintained like any other business process. If the CRM changes a field name or an integration changes its requirements, the automation may need to be updated.
The right feature set depends on the complexity of your workflows, but these capabilities are particularly useful.
Native Integrations
Native integrations are usually the easiest way to connect your form to another application.
Look for integrations with the tools your team already uses, such as CRMs, spreadsheets, email platforms, communication tools, and databases.
Webhooks and APIs
Webhooks are important when you need to send submission data to a custom application or system.
API support becomes increasingly useful when your team needs more control over how information is exchanged.
Conditional Logic
Conditional logic lets you create different paths based on form responses.
This is particularly useful for lead qualification, support requests, applications, surveys, and quizzes.
Workflow Automation
A good workflow system should let you define what happens after submission without forcing you to manually process every response.
Depending on the platform, this may include notifications, redirects, integrations, data transfers, or multi-step actions.
Analytics and Error Monitoring
Automation is only useful when it works reliably.
Look for ways to identify failed or incomplete workflows so your team can fix problems before they affect customers or internal processes.
Security and Permissions
If your forms collect customer, employee, financial, or other sensitive business information, review the platform's security controls, permissions, data handling, and compliance documentation before implementation.
Different tools solve different parts of the automation process. The important distinction is whether you need to build and automate the form itself or connect multiple external applications.
Tool | Best For | Key Features | AI | Automation | Zapier | No-Code | Starting Price |
Ovoform | Form automation | AI forms, webhooks, workflows | Yes | Yes | Yes | Yes | Free •30 days Pro Trail Free • Pro $19/month |
Zapier | App integrations | 8,000+ integrations, workflows | Yes | Yes | Native | Yes | Free • From $29.99/month |
Make | Visual automation | Scenario builder, webhooks | Yes | Yes | Yes | Yes | Free • From $10.59/month |
n8n | Advanced workflows | Self-hosting, custom logic | AI | Yes | Yes | Partial | Free • Cloud from $24/month |
Workato | Enterprise automation | Enterprise integrations, AI | Yes | Yes | Yes | Low-code | Custom |
Microsoft Power Automate | Microsoft ecosystem | Power Platform, approvals | AI | Yes | Yes | Yes | From $15/user/month |
Pipedream | Developers | APIs, webhooks, code workflows | AI | Yes | Yes | Low-code | Free • From $19/month |
Ovoform combines form creation with the ability to automate what happens after a submission.
This makes it useful when the form itself is the starting point for the workflow—for example, collecting a lead and then routing the response, sending notifications, or connecting the submission to another application.
The main advantage is keeping the form and its submission workflow closer together rather than treating form creation and automation as completely separate processes.
Best for: Teams that want to create forms and manage what happens after submission in the same workflow.
Zapier is designed primarily to connect applications and automate tasks between them.
It is a strong option when your workflow involves several third-party applications and you want a no-code automation layer between them.
Zapier's current plans are based around task usage, with a Free plan available and paid plans offering higher usage and additional capabilities.
Best for: Connecting forms and other business applications without building custom integrations.
Make provides a visual approach to building multi-step automation scenarios.
Its workflow builder supports routers, filters, and multiple connected applications. The current Free plan includes up to 1,000 credits per month, while paid plans start at $12/month for 10,000 credits when billed at the displayed monthly rate.
Best for: Teams that need visual, multi-step workflows with branching logic.
n8n is aimed more toward technical users who need greater control over their workflows.
It supports custom logic, APIs, integrations, and self-hosting options. Its cloud plans are based on workflow executions rather than simply limiting the number of workflows you can create.
Best for: Developers and technical teams building customizable automation workflows.
Workato focuses on enterprise automation and integrations across business systems.
It is more appropriate for organizations managing complex workflows, multiple applications, governance requirements, and large-scale automation.
Best for: Enterprise integration and business process automation.
Power Automate is particularly useful for organizations already using Microsoft products and services.
It supports cloud workflows, desktop automation, process mining, and Microsoft ecosystem integrations. Microsoft's India pricing currently lists Premium at ₹1,250 per user/month when paid yearly, before applicable GST.
Best for: Organizations heavily invested in Microsoft 365 and the broader Microsoft ecosystem.
Pipedream is designed with developers in mind and provides tools for connecting APIs and building programmable workflows.
It is useful when standard no-code connectors are not enough and developers need more control over how data is processed.
Best for: Developers working with APIs, custom logic, and event-driven workflows.
Pricing note: Automation platforms frequently change pricing, usage limits, and packaging. Check each vendor's current pricing page before making a purchasing decision.
Even a well-planned form automation workflow can fail if it's not designed carefully. Avoiding these common mistakes helps improve reliability, reduce manual work, and create a better experience for both teams and customers.
Automating without a clear goal
Do not start by asking, "What can we automate?"
Start with:
What repetitive process is slowing the team down?
Then automate that process.
Incorrect field mapping
If the wrong form field is connected to the wrong destination field, your automation can create bad data at scale.
Always test field mapping before launch.
Sending every submission through the same workflow
Different submissions often require different actions.
Use conditional logic when leads, customers, applications, or requests need different treatment.
Ignoring failed workflows
A workflow that silently fails can create operational problems.
Monitor errors and establish a process for handling failed submissions.
Creating duplicate records
If the same submission can trigger multiple workflows, you may accidentally create duplicate CRM records, emails, or tasks.
Define how duplicates should be identified and handled.
Not testing edge cases
A workflow that works with one perfect submission is not necessarily ready for production.
Test unusual inputs and every conditional branch before launch.
Before launching a workflow, check the following:
· Define the business goal
· Identify the form submission trigger
· Decide what should happen after submission
· Choose a native integration, webhook, API, or automation platform
· Map form fields correctly
· Add conditional routing where necessary
· Test normal submissions
· Test incomplete and unusual submissions
· Check for duplicate records
· Confirm notifications are delivered
· Monitor workflow failures
· Document the workflow for your team
· Review the workflow periodically
What should I consider before choosing an automation platform?
Evaluate integrations, automation capabilities, ease of setup, security, scalability, reporting, and pricing based on your business requirements.
A form becomes much more useful when the information it collects automatically moves into the next step of your process.
Instead of manually checking responses, copying data, notifying teams, and creating follow-up tasks, a form automation workflow can connect these actions into a repeatable process.
Start with one clear workflow. Define the trigger, map the data, add conditions where necessary, test every path, and monitor the results.
If you want to keep form creation and post-submission workflows together, Ovoform lets you build forms and connect what happens after each submission, giving teams a simpler way to move from collecting information to acting on it.
Create surveys, FAQs, and feedback forms in minutes with Ovoform — no code required.
Get started freeStart building with Ovoform today — free forever, no credit card required.
Get Started For Free