Ai Form Builders

Learn how to create conditional questions in Google Forms using branching logic and skip logic. Follow this step-by-step guide to set up sections, route respondents based on answers, troubleshoot common issues, and explore alternatives for advanced conditional logic.
Nikhil Dogra
November 19, 2026
Conditional questions improve your results by not making respondents answer irrelevant questions. This reduces the form length, produces cleaner data and increases completion rates. In this article, we will go beyond a 5 step guide. We’ll plan your flows, create conditional questions in Google Forms, ensure all your paths rejoin within the main form (often a forgotten step in other guides) and test them. We’ll also take a look at the issues you may encounter and how to fix them. Finally, we’ll give an honest insight into the limitations of Google Forms and what to do to improve.
Conditional questions appear in the form depending on what answers were given to previous questions. Conditional logic, branching logic and skip logic are all terms used to describe this. Depending on the answers received, your form navigates through its questions differently.
Within Google Forms, this functionality is called ‘Go to section based on answer’. Only Multiple Choice and Dropdown questions can have this functionality (Google Docs Editors Help). It allows users to be directed to a specific section of the form, or end the form, depending on which answer they selected.
No.
Conditional logic in Google Forms is limited to section navigation. Therefore, although you can send users to a different page depending on their answers, you cannot show/hide questions within the current page.
If you wish to show a question, such as ‘How many years experience?’ after the user selects ‘Yes’ to ‘Do you have experience?’, this is not possible using conditional logic. Instead, place this new question in a separate section. The user will need to click ‘Next’ to navigate to the new section.
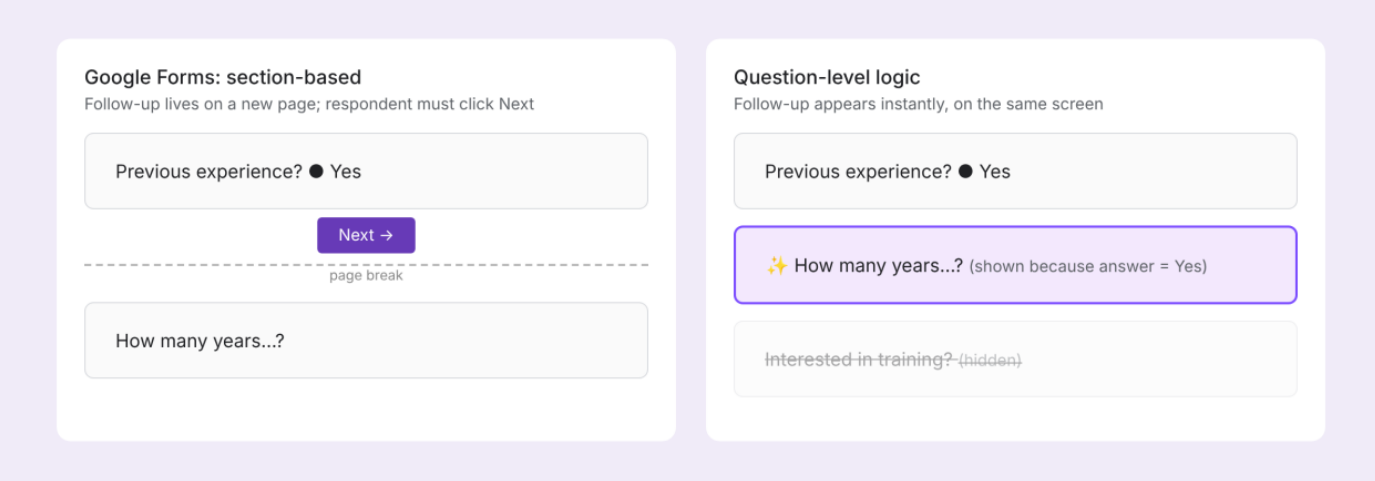
Figure 1. Section-based branching (Google Forms) vs. question-level logic
Side-by-side comparison: in Google Forms a follow-up question sits on a new page after a Next button, while question-level logic reveals it instantly on the same screen.
For a short survey with one or two branches, sections work fine. For anything bigger, keep reading. We cover the workarounds and the alternatives further down.
Taking 5 minutes to plan your conditions now will save you hours of frustration later! Write down 3 things:
Which question will be the condition, and what answers it will have.
For every condition, write down the name of each section and what questions will be included in it.
Where each condition should rejoin with the main form. In most forms, conditions split off, but then rejoin to include common questions (such as contact details).
As an example, in a recruitment form, if a candidate has experience, they are asked questions about their experience. If they do not have experience, they are asked questions about training. If they are under 18, the form finishes politely. Otherwise, everyone rejoins to provide contact details.
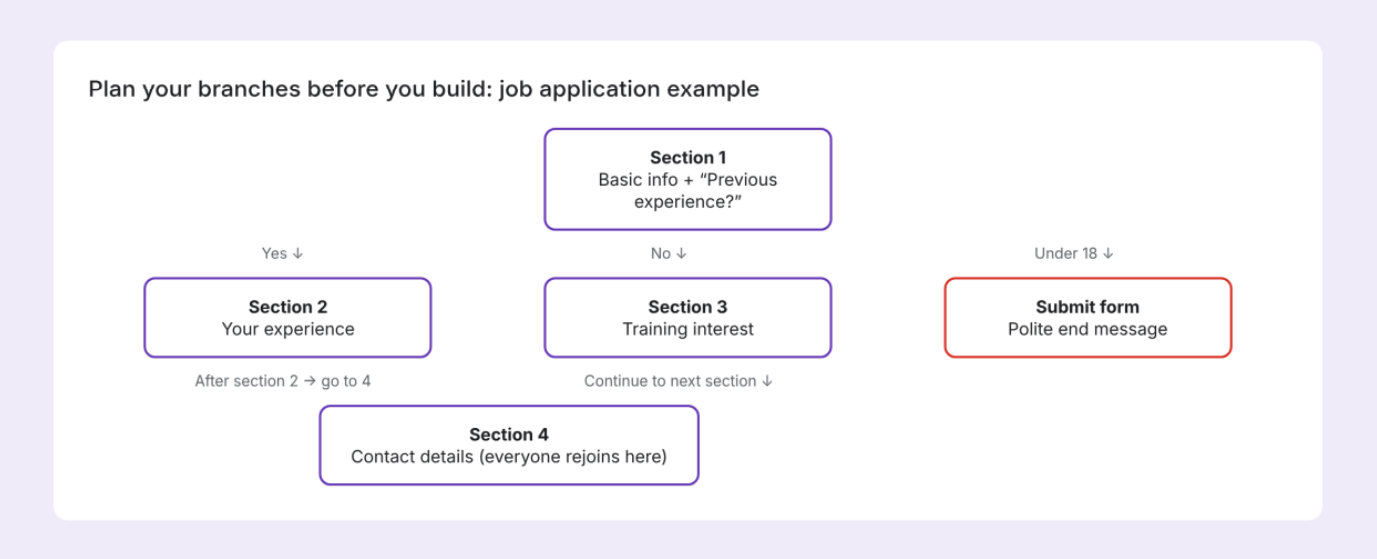
Figure 2. A branch map for the job application example
If the applicant has experience (section 1 yes), they are sent to section 2. If they do not have experience (section 1 no), they are sent to section 3. If they are under 18 (section 1), they submit the form. Sections 2 and 3 both rejoin in section 4 to get contact details.
Go to forms.google.com. Either begin a new form, or edit an existing form. Add a clear title and description so respondents understand why certain pages may be skipped.
Add your condition question. For example, ‘Have you had previous experience in this field?’ Select either Multiple Choice or Dropdown as these are the only question types that can be used to send users somewhere. Checkbox, Short answer, Linear scale and grid questions cannot.
Ensure this question is marked as required. If this question is skipped, users will be taken to the next section - meaning your conditions will not work.
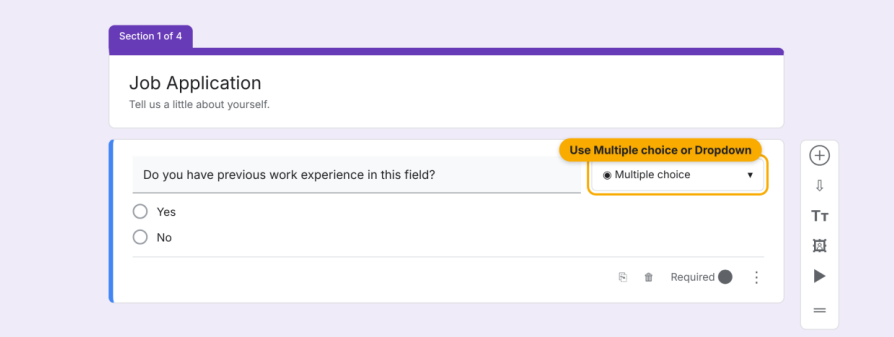
Figure 3. The trigger question must be Multiple choice or Dropdown
Multiple Choice question asking “Do you have previous work experience in this field?” with ‘Yes’ and ‘No’ options. Question type highlighted.
Click on the icon to add a section (2 bars stacked). For each condition in your plan, add a new section. In this example, add sections for “Your experience”, “Training interest” and “Contact details”. Within each section, add the appropriate follow-up questions.
Give each section a clear title. This will be displayed in the drop-down menus. Giving each section a clear name means it will be much easier to select the correct section to send users to. In this example, it would be far less error prone to choose “Go to section 3 (Training interest)” rather than “Go to section 3”.
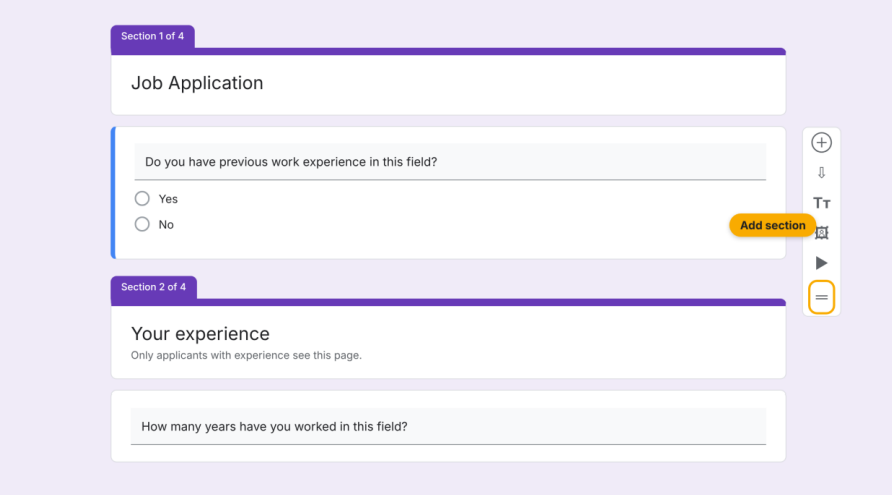
Figure 4. Use Add section to create a page for each branch
Section 1 and a new section (Section 2) called “Your experience” have been created. The icon to add sections can be seen in the toolbar on the right.
Click on your condition question. Open the three dots in the bottom right corner of the question. Choose ‘Go to section based on answer’. This creates a drop-down menu for each option.
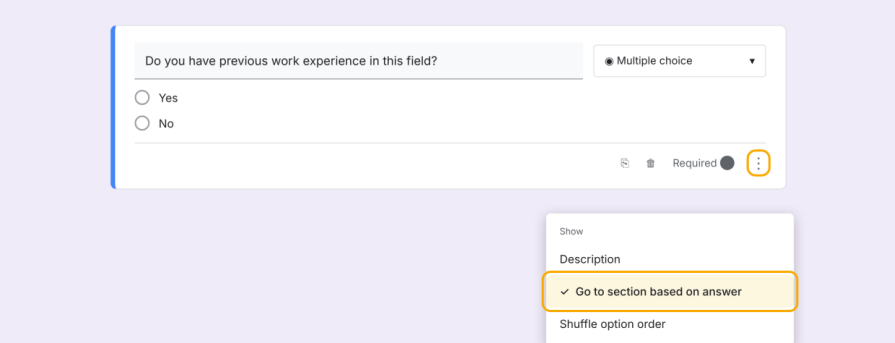
Figure 5. Enable Go to section based on answer from the three-dot menu
Three dots shown in the question. “Go to section based on answer” has been ticked and highlighted.
Choose where you want to send users for each answer in the condition question.
If ‘Yes’, send to section 2 (“Your experience”)
If ‘No’, send to section 3 (“Training interest”)
If ‘I am under 18’, submit form.
By default, all answers will be set to “Continue to next section”. Check the settings for each answer. Leaving default settings is the most common issue when creating conditions.
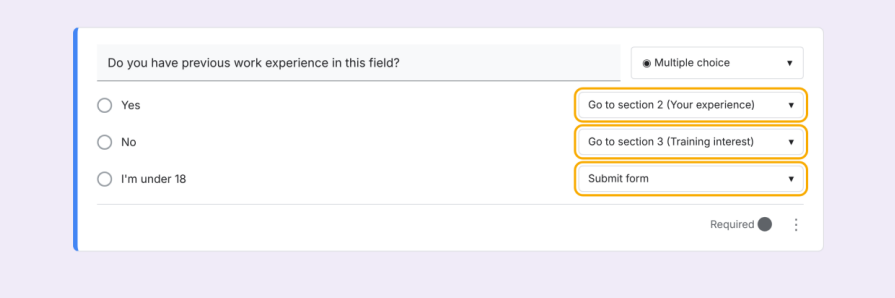
Figure 6. Map every answer to a section, or to Submit form
For each answer (Yes, No, I’m under 18), a drop-down has been added to send users to a section, or submit the form.
[This is often a step missed in other guides]. By default, users will be sent to the next section in order. If users complete section 2, they will automatically be sent to section 3 (newcomer questions) unless prevented from doing so.
Below each section, there is a drop-down menu with the option “After section X”. In this example, after section 2, we want experienced applicants to be sent directly to section 4 (contact details), therefore in section 2 choose “Go to section 4 Contact details”. In section 3, leave as default (“Continue to next section”) as section 4 is next.
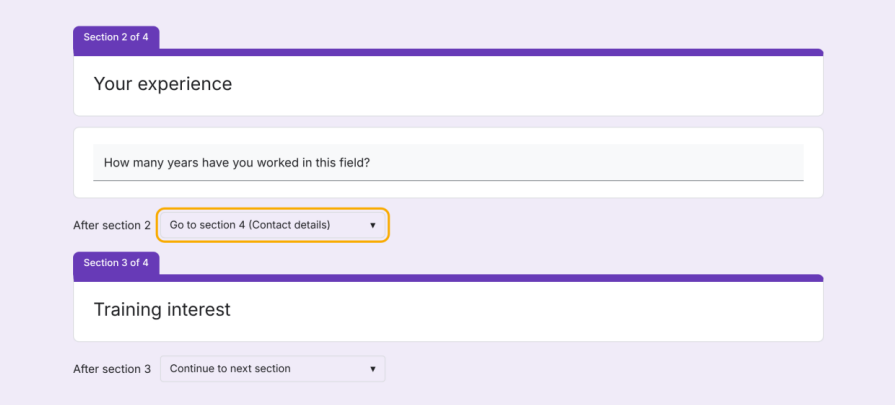
Figure 7. Use the After section dropdown so branches rejoin correctly
After section 2, users are sent to section 4 (Go to section 4 Contact details). In section 3, users continue to next section.
Click the eye icon to preview the form. Run through the form with all possible answers to ensure they all send users to the correct section. In this example, preview with three answers (yes, no, under 18). Ensure users are sent to the correct section, rejoined in contact details and submitted.
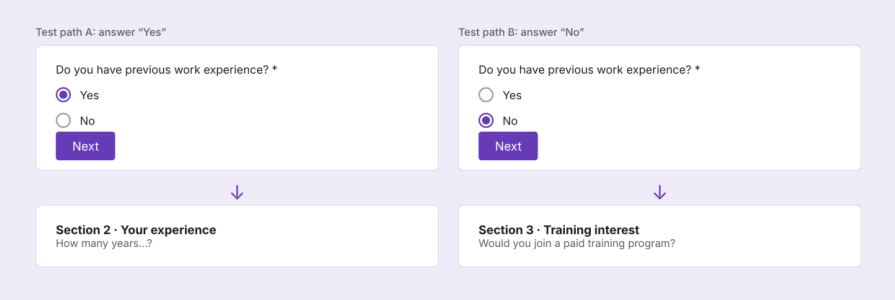
Figure 8. Test each answer path in Preview
Previewing the form. Choosing yes sends users to section 2 (your experience). Choosing no sends users to section 3 (training interest).
Once all conditions are sending users to the correct sections, publish your form. If it will be printed on paper (flyers/posters), use our free QR Code generator for Google Forms to create a printable QR code linking to your form.
Scenario | Question | Condition |
|---|---|---|
RSVP to event | Will you be attending? | If “Yes”, send to section with meal and accessibility details. If “No”, submit form. |
Customer feedback | How would you rate us? | Dropdown options 1-5. If 1-2, send to section “What went wrong?” If 3-5, ask for testimonials. |
Course application | What level? (Beginner/Advanced) | If beginner/send to beginner schedule section. If advanced/send to advanced schedule section. Both sections rejoin to payment section. |
Qualify Leads | Company size? | If 1-10, ask questions for small businesses. If 50+, book in a sales call. |
Support request | What support do you need? | If “Billing”, “Technical”, or “Account”, send to specific team section. All team sections result in submitting form. |
Note: Linear scale questions cannot be used for conditions. If you need to ask for satisfaction ratings, use a Dropdown with options 1-5. If measuring loyalty, use our free NPS Calculator to calculate results once you have responses.
Issue | Likely Cause | Solution |
|---|---|---|
“Go to section based on answer” not appearing | Wrong question type | Change to Multiple Choice or Dropdown. Checkbox and text questions cannot be used for conditions. |
Users seeing questions from alternate paths | “Continue to next section” in After section drop-downs. | In each section with conditions, set to jump to the shared section (step 6). |
Some answers seem to be being ignored | Default settings chosen for answers | Go back into the drop-down lists for each answer, and choose a destination for all answers. |
Unpredictable conditions | Multiple condition questions within the same section. | Just one condition question should be in each section, and placed at the end of the section. |
Users skipping over conditions | Condition question not set to mandatory. | Make the condition question mandatory. |
Conditions broken since adding sections | Numbers of sections changed. | Double check all drop-downs in conditions after adding/moving/deleting sections. |
Also note that users can go back to change previous answers, meaning they may take an alternative route. If your form is long, test this too.
Google Forms are free to use, however as forms get more complex, you may run into these limitations:
Cannot use conditional logic on the same page. If you wish to show/hide individual questions, this is not possible. Each condition must be on a new page, and requires an extra click from users.
Only 2 condition question types. The only question types that can be used to set conditions are Multiple Choice and Dropdown. It is not possible to set conditions using Checkbox, Text, Number, Date, or Scale questions.
No AND/OR conditions. Each condition can only be based on a single answer to one question. It is not possible to set conditions on multiple answers to multiple questions (e.g. “If they’re a manager AND in sales”).
Too many sections. To create conditional questions in each condition, a new section must be created. This can make long forms with multiple conditions very confusing and easy to break.
No single overview of conditions. There is no single screen where you can see all the conditions. You must go through each section to check.
No actions based on outcomes. You cannot tag users, score leads or receive an email when users answer something specific, unless using add-ons or scripts.
If any of the above limitations are problematic, there are many form builders that allow you to create conditions for each question. Jotform allows conditions to Show/Hide Fields. PlatoForms allows rules for individual fields, and involve.me allows AND/OR conditions. Ovoform lets you write conditions in plain English.
To find out more about the best alternatives, read our guide to Google Forms Alternatives.
Tool | Type of logic | Ease of setup | Best for |
|---|---|---|---|
Google Forms | Entire section (page) | 3 dots > Go to section based on answer | Simple, free conditions |
Jotform | Individual fields | Settings > Conditions > Show/Hide Field builder | Long forms with many fields |
PlatoForms | Individual fields & pages | Rule builder | PDF/document processes |
involve.me | Individual questions | Rule builder with AND/OR | Quiz funnel & lead generation |
Ovoform | Individual questions (1 per screen) | Write conditions in plain English or using Logic & Automation tab | Non-technical teams wanting logic without rule builders |
Ovoform is an AI form builder. Simply describe what conditions you want and Ovoform will create them for you.
Describe what you want in your form. For example: “Create a job application form for a café: name, role, previous experience, years of experience, availability and contact details.”
Type in conditions. In the chat bar, type “Chat to set up workflow rules”. Within this chat, type “How many years of experience?” If they’re under 18, skip to the end screen.
Review your conditions. Ovoform will show you a visual representation of these conditions in the Logic & Automation tab.
Include actions (optional). Within the same sentence, you can tag users, score them, or get notified via email/Slack if they meet a condition.
Preview and share. Preview to test all conditions, and share. Responses can be sent to Google Sheets, Hubspot, Mailchimp, Airtable, Slack and more.
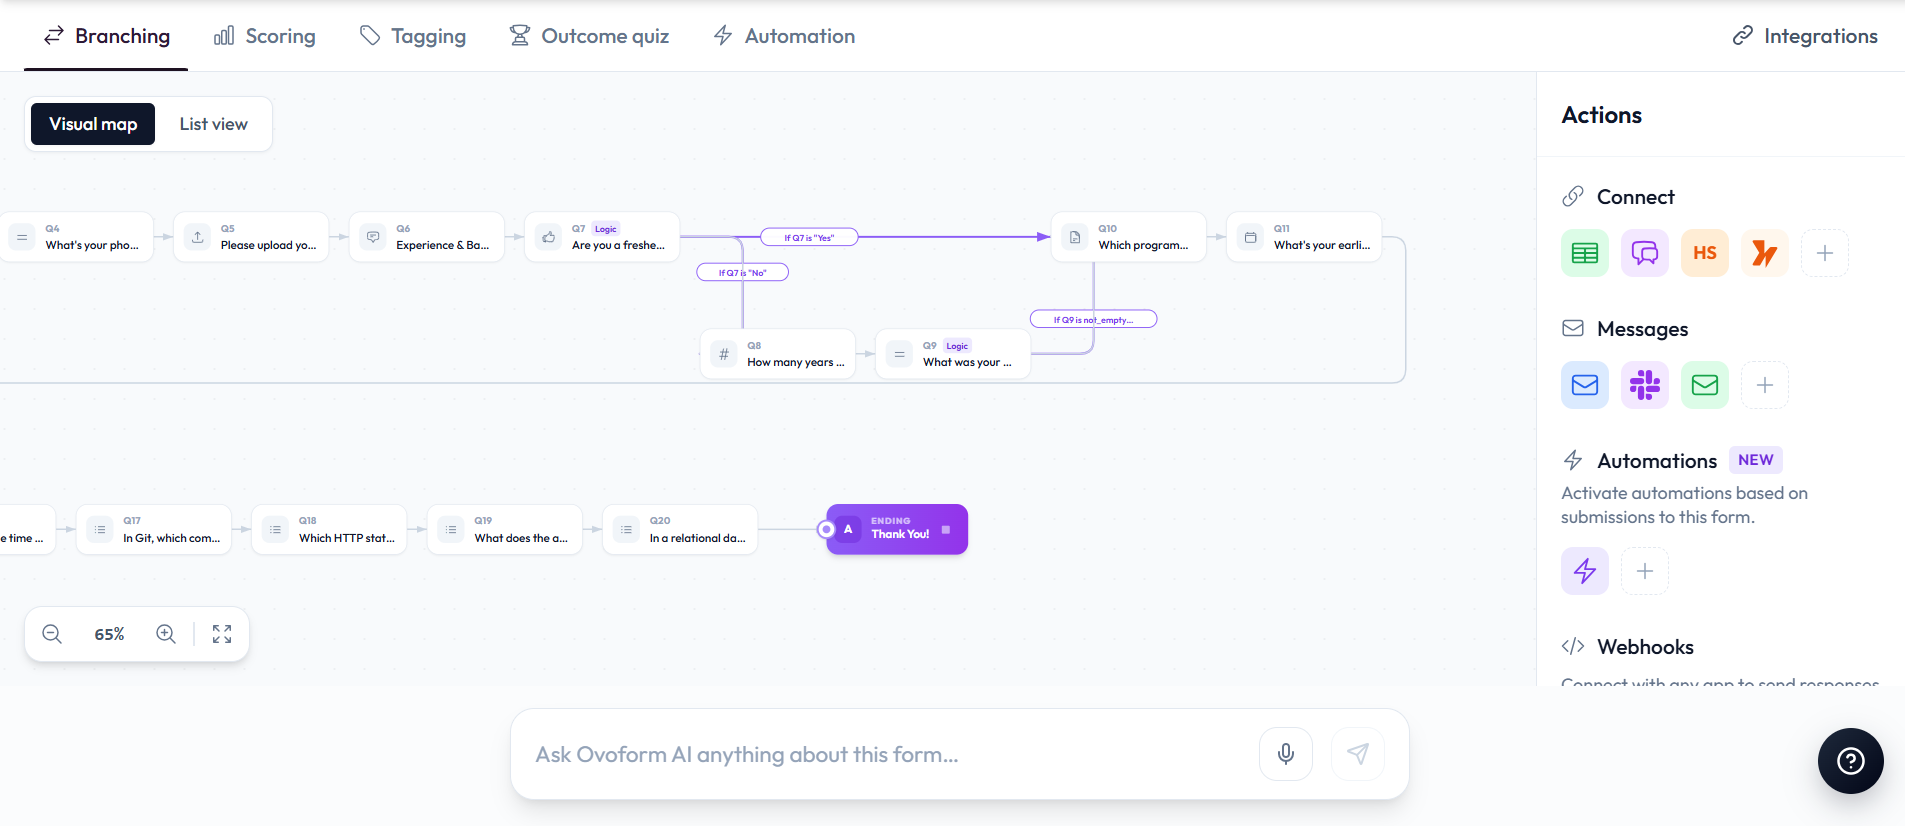
Figure 9. Logic via prompt in Ovoform: one sentence becomes three rules
Because Ovoform shows one question per screen, follow-ups appear the moment they’re relevant. No sections, no Next-page detours. Responses are unlimited on every plan, including Free.
Rebuild your Google Form in Ovoform by describing it, then add your logic in one sentence. Pro features come with a 30-day free trial.
Remove questions instead of adding them. This makes shorter forms for each user.
Make the condition question early in the form so users are sent to the right questions quickly.
Always plan where conditions rejoin. Make sure that each condition leads to a common section, or ends the form.
Avoid deep conditions. If you have more than 2-3 conditions in Google Forms, it can be very fragile. Consider planning conditions, or using an alternative tool.
Give users clear messaging if they finish early. Ending the form with “submit” shouldn’t feel like a rejection.
Double check conditions have worked after any changes. Adding or moving sections can quietly break conditions.
Once you know how to format them, conditional questions in Google Forms are straightforward to create. Place one section for each condition, apply ‘Go to section based on answer’ in a Multiple Choice or Dropdown question. Use ‘After section X’ to ensure conditions rejoin correctly. Finally, preview the form with each answer to make sure everything works. If you need to show questions on the same page, multiple conditions or actions (tagging/notifying users), using an individual question tool will make setting up conditions easier.
Ready to make your conditional form without any setup? Describe your form and conditions in Ovoform for free.
Create surveys, FAQs, and feedback forms in minutes with Ovoform — no code required.
Get started freeStart building with Ovoform today — free forever, no credit card required.
Get Started For Free